Thursday, October 25, 2012

Day 10: Candy Corn Cheesecake Cupcakes


We were going to go to an October birthday celebration and I was the one that was scheduled to bring the treats, so I came up with Candy Corn Cheesecake Cupcakes.  I got the inspiration for these from a couple of sources.  The actual recipe is from Skinny Taste.  The recipe is supposed to be a healthier version of cheesecake bites.  I made a slight variation to the recipe, which I will list later.  Then the idea to have it look like a candy corn came from Eighteen25 (it was a guest post from blogger Jamielyn from I Heart Naptime).  Well, it turns out that the playdate at the park didn't end up happening because it was rainy and stuff came up for everyone.  This meant that we got to enjoy these cupcakes all to ourselves!  It is a good thing that there were only 12 servings for this recipe!

Ingredients:
Filling:
-8 oz light cream cheese
-1/4 cup sugar
-1 tsp vanilla
-6 oz low-fat Greek yogurt (the original recipe called for nonfat vanilla Greek yogurt, but I already had plain low-fat on hand).
-2 large egg whites
-1 tbsp all-purpose flour
-yellow & red food coloring
-candy corn

*In the original recipe she had reduced fat vanilla wafers as the bottom of the cheesecakes.  I bought some vanilla wafers, but they were too small for the bottom of the cupcake liners so I did the following.

Crust:
-20 wafers (I would maybe do 30 wafers since 20 wasn't enough).
-2 tbsp melted unsalted butter

Directions:
-Heat oven to 350
-Line a cupcake pan with 12 liners

Crust:
-Chop of the wafers in a food processor until they are crumbles.
-Add the butter and mix until combined.
*They were too buttery so I should have added in more wafers or cut the butter amount down.
-Put a portion of the crust in the bottom of each liner.  Push down on the crumbs to make it firm.


Filling:


-Gently beat the cream cheese, sugar and vanilla until smooth with an electric mixer.
-Gradually beat in the yogurt, egg whites, and flour.
-Separate the batter into three bowls with each bowl have a little less than the previous bowl.
-With the bowl with the most batter add in yellow and red food coloring and mix until you get the desired orange color you want.
-The bowl with the middle amount of batter add in yellow food coloring until it reaches your desired consistency.
-Leave the last bowl the color of white.


 -Add in the yellow color first to the cupcake liners that are already filled with the crust.  I don't know how much for each because I just eyeballed it.


-Add in the orange on top of the yellow.


-Lastly, add the white batter on top of the orange.  I didn't have enough white batter to cover the tops of the "cupcakes," but I kind of like the look of them not being completely covered.


-Bake for 20-25 minutes until the center is almost set.
-Add in a candy corn in the center of each cupcake
-Cool to room temperature
-Chill for at least an hour in the refrigerator


-Take out and serve!  I wish that I got a picture of what they looked like layered!


Enjoy these because they were very yummy!

Heather

Wednesday, October 24, 2012

Day 9: Spider Lollipops


Here is another cute craft that doesn't take that long to make and the kids will LOVE them :).

Supplies:
-Lollipops (I used small tootsie pops)
-Pipe cleaners (4 per spider)
-Googly eyes
-Glue
-Scissors


Directions:

Step 1: Cut the pipe cleaners in half.  Each 1/2 of the pipe cleaner will be two legs.


Step 2:  Take one pipe cleaner and bend it in half.  Then in the crease mark where the half is put the lollipop.  Then bend the pipe cleaner around the stick of the lollipop to hold it onto the stick.  Repeat with the next three pipe cleaners.  Once all pipe cleaners have been attached then you want to bend them so that they resemble spider's legs.

Each lollipop is facing a different direction & how you want to do it is up to you.


Step 3:  Add some googly eyes to the front of the spider with some glue.  Once the glue dries the spider lollipops are good to go!


-Heather

Monday, October 22, 2012

Day 8: Mummy Juice Boxes


The Mummy Juice Boxes was actually an idea that I got from a friend that brought these to a Halloween party last year.  I thought that it was pretty genius.  I didn't look for a tutorial because it was simple enough for me to figure out.  I also happened to have all of the supplies on hand!  Good thing I like to have crafty stuff laying around my house because this challenge would have been even harder!

Supplies:
-Juice box(es)
-White tape.  I used masking tape
-Googly eyes


Directions:

Step 1:
Take the straw off of the juice box and then wrap the white tape around the juice box.  Wrap it horizontally and diagonally to give it the mummy look.  I decided not to tape the bottom and top of the juice box so that the straw could easily be put in and so that they would stand flat.


Step 2:
Add on some googly eyes.  I just used the tape and put some on the back of the eyes and taped them to the box.  Then I got some tape and partially covered the eyes to give it a more authentic look (see the first & last picture in the post).


Step 3:
Tape the straw to the back and they are done!  Easy peasy!


-Heather

Fail!

I have failed this challenge!  I did give it a good try, but I really should have looked at my calendar and seen that it would have been hard for me to do.  I guess that I just wanted to do another challenge since I haven't done one.  I will finish posting all of the things that I have done.  Any days that I did not do I will post to a link of some cool Halloween thing!  The reason why I did not complete this challenge is that for the past couple of weeks we have had visitors.  It is hard doing challenges when entertaining guests.  Then, the boys and I got sick :(.  Oh, the good camera that I was using broke, but I am hopeful that we can get it fixed.  Note to self, do not leave an unattended camera near a toddler!  Did I mention that Little Bubs turned two?  So, there was that too.  Anyway, enough with the excuses.  

Last night we were watching the office and they had this fail video on.  It wasn't super funny, but when I was writing this post it reminded me of the snippet.


Enjoy

-Heather

Saturday, October 13, 2012

I'm Behind!

I got busy with other things and it was Little Bubs' birthday.  I have kept up doing things each day that is Halloween themed and now I just have to blog about it.  I will try and get that done later today!

Tuesday, October 9, 2012

Day 7: Ghost Footprints


This craft was a super easy one to do and doesn't take a lot of time, which is nice when you have two boys that are not that into crafts and would rather be building or digging something up.  I found this craft at Be Different Act Normal.

Supplies:
-Colored paper (I thought that black or a dark blue would look best)
-White paint
-Paintbrush
-Sharpie marker or black paint
-Feet


Directions:

Step 1:  Paint the bottom of some feet white.  Both of the Bubs really enjoyed this step and I got some good laughs out of them!


Step 2:  Step on the paper with the painted foot.


Step 3:  Repeat steps 1 & 2 with other feet until you have as many footprints or "ghosts" that fit on a page.
L-R My foot, LB's foot, and BB's foot
Step 4:  Add in some ghost eyes and mouth and any other little touches you want to the picture.


Happy Halloween!

-Heather

p.s. my children's feet are almost as big as mine!

Day 6: Pumpkin Cupcakes


I know that pumpkins aren't necessarily a Halloween thing, but I really think that they are a big part of Halloween so any recipe with pumpkin in it will count for me :)!

Little Bubs birthday is this week and since we have family in town now and not during his birthday we decided to celebrate a few days early.  For the birthday dessert I made Pumpkin Cupcakes with a Salted Caramel Buttercream frosting.  It was delicious!  I got the recipe from Made In Melissa's Kitchen and you should go check out her blog for the recipe and photo (I'm feeling too lazy to type it out and you should really see what the cupcake should look like!).  I have to learn how to frost cupcakes and since I'm not a huge buttercream fan I don't like to put on a lot of frosting like what is in her pictures.  Plus, I burned the caramel a little, so mine has a darker cream color to it.

I have finally learned my lesson too!  Most cookie and cupcake recipes make 24 servings.  24 servings is just way too much and I end up eating a lot more than what I should.  This time I remembered to cut the recipe in half so I would only get 12 cupcakes, which was plenty!  I made a couple of changes to her recipe.  I used only unsalted butter, but added in a little more salt to make up for the salted butter I wasn't using.

The cupcakes and frosting turned out really great and Little Bubs ate it all up!

-Heather

Saturday, October 6, 2012

Day 5: Toilet Paper Roll Bat


Today's craft is a bat!  Amazingly enough I came up with this idea all on my own!  I'm sure that someone out there has thought of the same thing, but I swear that I didn't find this idea on Pinterest or any other sight :).

This craft is super easy to make and I had all of the supplies around my house, which is always a bonus!


Supplies:
-Toilet or paper towel roll
-Thin cardboard (we used a cereal box)
-Scissors
-Double-sided tape
-Glue
-Black paint
-Paintbrush
-Googly eyes


Directions:

Step 1:
Cut the roll down to the size that you want.  I cut mine to 3".

Step 2:
Get some double-sided tape and put it inside the roll of the toilet paper near the top (not all of the way to the top because some will be cut-off).  Pinch the sides of the toilet paper roll where the tape is to create a seal at the top.

Step 3:
Cut out some bat ears where the seal is (see below).


Step 4:
Paint the roll black and let dry.


Step 5:
Make some bat wings.  I just winged it!  I took a piece of paper and made one wing and then folded it in half and cut it out and used that as my template.  I then traced it on the cardboard from the cereal box.  I then cut out the bat wings.  After you cut them out paint them black too.  The side of the cardboard that has print doesn't take the paint very well, so I had to use a couple of coatings, but I did like the look of it showing the print through (you'll see below).


Step 6:
Once the paint is dry, glue on some googly eyes.  You could also paint some eyes on if you didn't have some googly eyes on hand.


Step 7:
Use the double-sided tape (or glue) and attach the bat wings to the back of the bat.  You can see here how the shiny part of the cereal box is showing through, but I thought it looked neat.


The bat is done!  You can add a mouth with fangs if you wanted to, but I just wanted to keep it like this.


Now just add a pumpkin to make it look official :)
Happy Halloween!
 Enjoy!

-Heather

Day 4: Cheese Stick Fingers


I saw this idea on Pinterest from Our Best Bites and I thought that it would be a fun Halloween snack that would be easy to do.  They are a good representation of fingers and I loved the idea.

Supplies:
-String Cheese
-Sliced Almonds
-Jelly (preferably one that is colored pink/red)
-Knife

Directions:

Cut the cheese sticks in 1/2 (this also makes it more bite size and good for parties).  Then "shave" off the end of the cheese stick where you want the "nail" to go.  Take the back side of the knife (not the sharp side) and make three indentations into the cheese to form the finger joint.  Add a little jelly to the shaved off portion of the cheese stick and add the almond to it.  In the original post they used cream cheese, but I liked the look of pink/red jelly to give it a "blood" look.  I also added some jelly at the end of each cheese stick.


Enjoy the yummy treats!  Little Bubs really did.  BTW, I got his hair cut and it is a bit too short and not the best because he wasn't doing well staying still :(.  At least hair grows out!


-Heather

Friday, October 5, 2012

Day 3: Paper Ghosts


Paper ghosts or Spinning Spirits from Parents.com is the craft that we did yesterday.  The pictures on their website look so much better, but oh well!  One of these days I'll get around to figuring out how to take decent pictures :)!  We have actually been making a ton of these ghosts because Big Bubs has had such a fun time doing them an they are super easy to make.

Supply List:
-Paper
-Scissors
-Pin
-String (we used fishing wire)

Supplies

Directions:

Step 1: Draw a ghost shaped head and then make the body swirl around like a snail.  The ghost below is wearing sunglasses because he's a cool ghost!

BB drawing out the ghost
The ghost all drawn out (I had to fix the circle part)
Step 2:  Cut out the ghost and cut along the swirls until you reach the end.  BB has a hard time with the cutting so I mostly did it.


Step 3:  Cut a little hole in the top of the ghosts head and string some wire, yarn, or string through it and then hang it up.  Pull a little on the tail to make it come down.


Enjoy watching the ghost spin around.  BB has many of these ghosts hanging up in his room and has brought one to school to "scare" the kids.

This is a ghost that I made

Enjoy!

-Heather

p.s. On the original site they say to use poster board, which I am sure would make some awesome ghosts, but using regular paper for us worked just fine and it is what we have on hand all of the time!

Thursday, October 4, 2012

Day 2: Pumpkin Cheeseburgers


From the title I'm guessing that you might have thought that there was actual pumpkin in the cheeseburgers, but that was not the case.  We just made the cheese to look like carved pumpkins :).  I got this idea from Red Ted Art.  They actually didn't come up with the idea, but they could not find the original source.  I thought that it was pretty genius for whoever thought of it!

Last night was cheeseburger night and I just happened to see this idea from Pinterest and I thought that it was really appropriate for my challenge.  It was super easy to do and the boys LOVED it!

First I got my cheese slices and cut little faces in them.  From the inspiration picture of these they used square pieces of cheese, but I thought that the round ones would look better, so I got some Colby cheese from TJs (can you tell I shop at TJs a lot?).  BB got really excited when he saw the faces being formed.  Plus, he liked eating the cut-out cheese.


We started grilling the burgers and my husband was convinced that the cheese slices would melt a lot and you wouldn't be able to see the faces.  I told him that I had confidence that they would be fine!  Turns out I was right (see the first photo).  I actually think that they turned out really well.

Pumpkin face cheeseburgers on the grill
Doing Halloween themed stuff is pretty fun!

-Heather


Wednesday, October 3, 2012

Day 1: Costumes!

What is Halloween without costumes?  I personally haven't had a Halloween costume in a long time, but every year my boys have worn one.  This year I had asked Big Bubs what he wanted to be for Halloween and he said that he wanted to be a shark.  My reply, "A shark?  Why do you want to be a shark?"  I should preface this by saying that for Big and Little Bubs they were both sharks for their second Halloween.  It was a cute outfit, but I'm kind of tired of sharks.  BB would not budge on this subject.  I have no idea where he got the idea, but I have asked him several times thinking that he would change his mind.  It did not, so a shark it is!  I had looked at patterns to make a shark costume, but I had to give myself a reality check because 1) I don't know how to sew and 2) I have no time to figure out how to sew a costume.  I searched online and the best costume and deal was one from Target.  I just looked at the costume and it looks like they are all sold out!  I'm so glad that I got it when I did!


I know, I know I need to figure out how to take better pictures or get them off of the web better, but you get the idea of what his costume is going to be.  We got the Kids' size 4T-6T and my BB is on the short side and this costume barely fits him.  I think that the sizing is really small, but luckily it works for us because they don't have a bigger size!  We just got the costume in the mail two days ago and BB has already worn it a lot.  He loves it and wants to always wear it.  I had to take it and put it away so that he doesn't destroy it before Halloween.

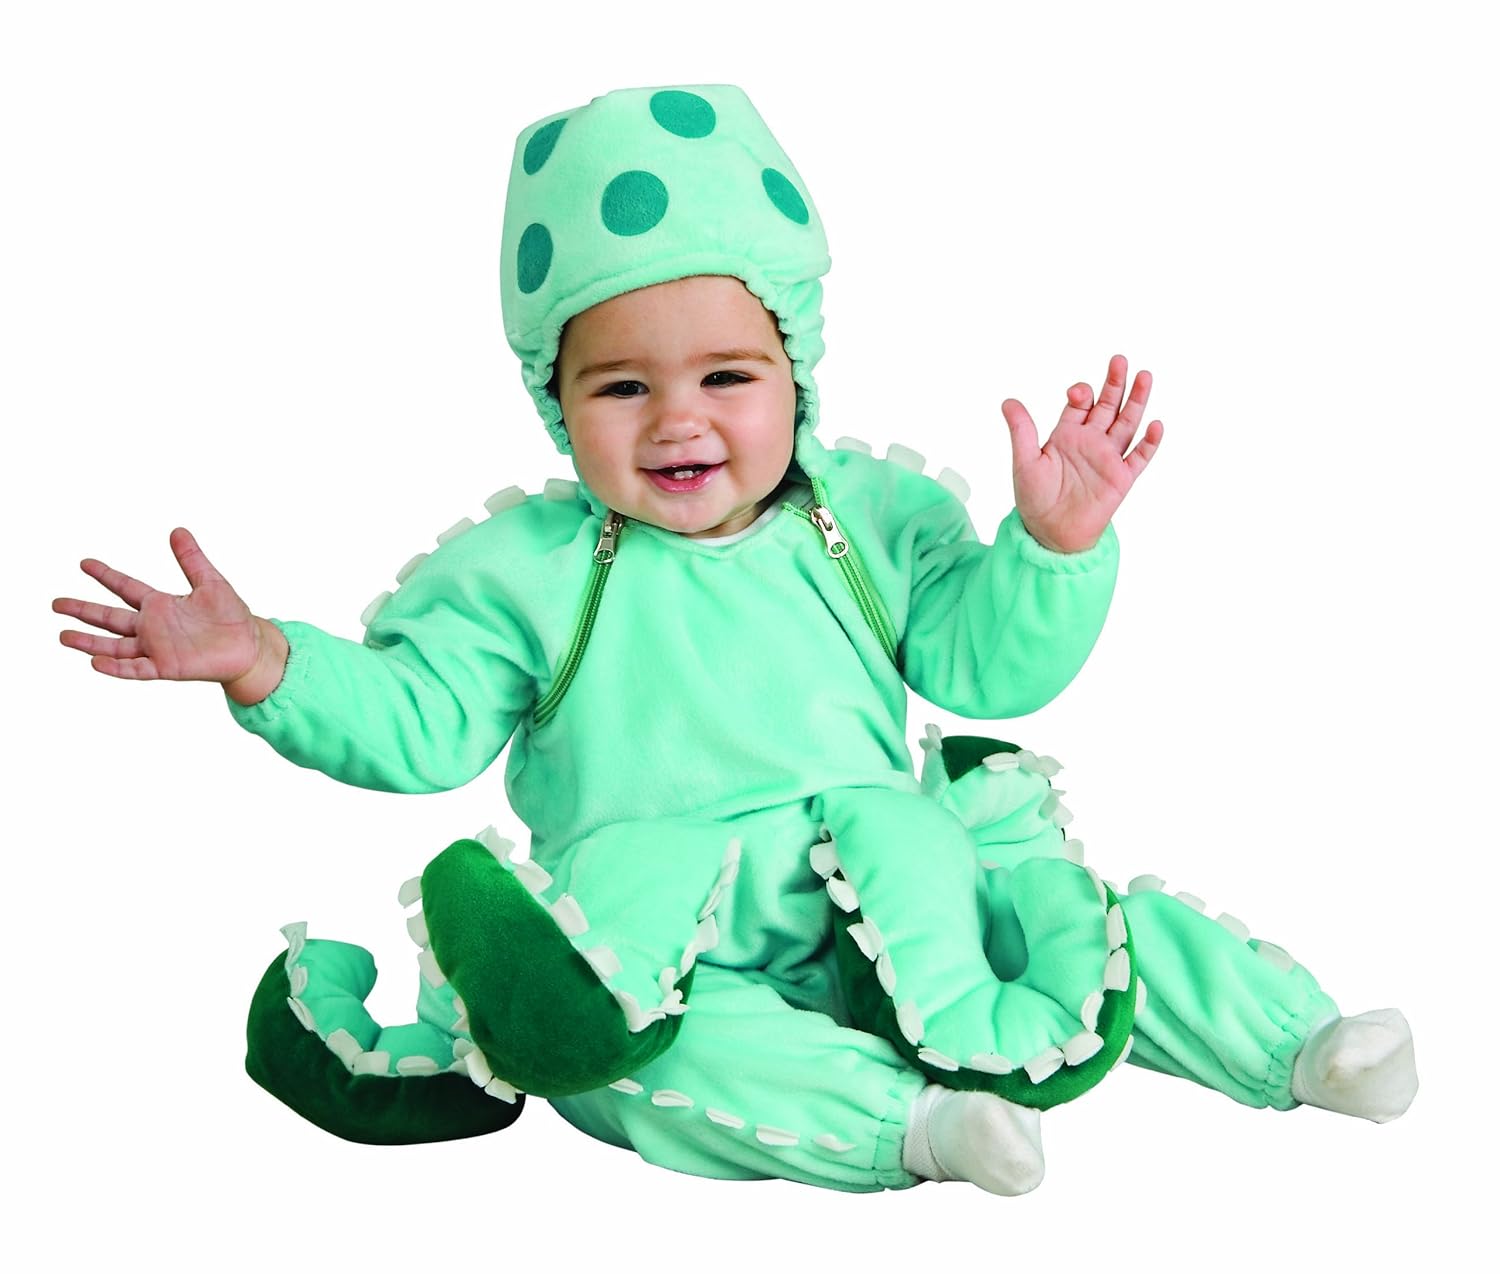
Since BB was going to be a shark I figured that I could keep with the Ocean theme and Little Bubs could be an Octopus.  I found the best deal on Amazon.  It is cute and I have only managed to get it on LB once.  He cried the whole time and wouldn't let me put the headpiece on, but the headpiece looks small.  Even on the packaging the kid doesn't have it all the way connected under the chin.  I just hope that this Halloween is not going to be a miserable one for him being in this costume!

I got the above picture off of the web!  I think maybe the Target one just wasn't working right.  Anyway, that will be LB's costume.

Then we were at Target the other day and we got the plastic pumpkins for the candy.  They had blue and I thought that it would be perfect for the Ocean theme that I'm going with.


Lastly, since I got the costumes before this 30 day challenge I am going to give you something else related to the fall/Halloween.  But before that, I just have to toot my own horn and say that I can't believe that I am this ahead of the game for costumes.  Usually I like to do stuff last minute, but this year not so!  Let's just hope I can keep that up :).

I went shopping at Trader Joe's and I found these gems!


We love the breakfast bars from Trader Joe's and when I saw that they had pumpkin I got so excited!  I couldn't wait to try them and they did not disappoint!  Now the problem will be to limit our intake of them because they are still filled with sugar and lots of ingredients, but they are very delicious!

-Heather